It's been a while! I apologize for my long absence in crafting and posting; I have spent the last months experiencing all of the joys that a first trimester of pregnancy can bring. It was rough, but I am finally regaining some of my energy and trying to find the floor in my craft room again (kids...). I have a fantastic Valentine's Day craft in the works and will hopefully finish it by tomorrow. Thanks for sticking with me!
Emily
Showing posts with label Family. Show all posts
Showing posts with label Family. Show all posts
January 13, 2011


October 15, 2010
Triplet Train Bunting
A friend of mine has triplet boys--Can you even imagine? She is a complete saint and one of the best moms I know. With three infants, though, she has people in and out of her house (helping) day and night...Lots of people. I've been going over every Thursday night; in the beginning, I had trouble remembering which baby slept in which crib, as they are all three in one room. I wanted to make something special for her boys and thought of a name bunting to hang over each crib, a way to make sure that all of her helpers know which boy sleeps where. Here they are:


What do you think?
September 5, 2010
Princess Tea Party
My daughter turned five years old yesterday, so we celebrated with a Princess Tea Party! Because she's still so young, we only wanted to do something small. We had six girls, for just an hour and fifteen minutes. It was perfect... Any longer and I think it might have lost its magic. Let me show you what we did!
Decorating was the main event. Luckily, we were able to dig around our house and find just about everything that we needed. I had purchased the giant rose wreath months ago at Goodwill--I was going to pull the roses off and use the frame, but it was perfect for our tea party. The lamp is from my kids' bedroom. Then we just filled every glass jar we could find with pretty candies. I picked up the china cupcake stand for a couple of bucks at Goodwill, as well. We really only bought candy and balloons!


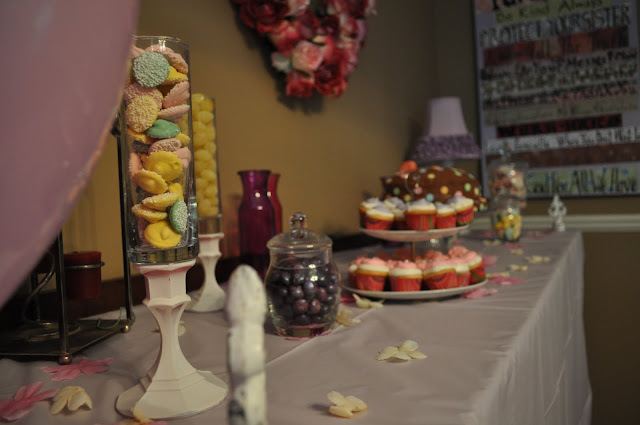


Decorating was the main event. Luckily, we were able to dig around our house and find just about everything that we needed. I had purchased the giant rose wreath months ago at Goodwill--I was going to pull the roses off and use the frame, but it was perfect for our tea party. The lamp is from my kids' bedroom. Then we just filled every glass jar we could find with pretty candies. I picked up the china cupcake stand for a couple of bucks at Goodwill, as well. We really only bought candy and balloons!

The cupcakes were a cinch to decorate. I whipped up a batch of buttercream frosting, dropped a dollop of white onto each mini-cupcake, refrigerated them until set, then dropped another dollop of either pink or purple on top. I topped them with a tiny pearl candy.


The cake is a two layer chocolate cake with chocolate buttercream frosting between the layers and on the outside. I then used giant confetti sprinkles to polka-dot the whole thing. I used the mini candy pearls (like on the cupcakes) to make a "5," and to outline the rose. I created the rose from marzipan, then used edible pearl dust to color it pink.

To begin our tea party, we rang this beautiful bell. It was my grandma's.

My daughter found this fancy hat candle holder at Goodwill, too, for only $2. I always think of big hats when I think of tea parties, don't you?

To set the table, I purchased a cup and saucer for each girl, from Goodwill. Each cup and saucer only cost about $.30, so to say that it was cost effective is an understatement! We sent them each home with their own teacup and saucer, in lieu of goodie bags.
We began the party by decorating the crowns you see at each place setting (12 for $2.50 at JoAnn's). The girls could color their crowns or glue tiny jewels onto the front. (We already had the jewels, as they were actually the dragon scales that we used in the wand cores for my son's Harry Potter birthday party in April.) This was a good opening activity, as it gave the kids something to do when they arrived, and while they waited for the actual tea party to begin.

After crown decorating, we painted their fingernails. I just grabbed a few dollar varieties, plus some cheap decals that we put on once their nails were dry. This was a big hit; all the girls talked about how excited their moms would be to see their pretty nails.

While the girls had their nails painted and waited to dry, my husband did face-painting. We didn't do anything crazy, just whatever little thing the girls wanted. It was mostly balloons, butterflies, hearts, etc. I do think he did a castle with a moon in the middle and a red Christmas tree, though...

After the nails were dry and faces were painted, we served pink hot chocolate. We don't drink real tea, plus I figured the girls would prefer hot chocolate to tea any day. I simply heated eight cups of milk on the stove, poured in a bag of white chocolate chips (once the milk was steaming), added a touch of vanilla, then some pink food coloring. Voila!
We also served the cupcakes, candy, cookies, etc. that were being used as decorations during this time. This was the actual tea party!


Once the hot chocolate was poured, we sang Happy Birthday and ate cake. Did I serve way too much sugar? Yes. Was it worth it, though? Definitely!

Then we opened presents and time was up! Short and sweet describes our Princess Tea Party perfectly. My daughter loved it, the other girls had fun, and it was so very simple to do. What more can you ask for?
I'm linking up to:

I'm linking up to:
August 6, 2010
Disobedience Dimes
I know that it must appear that my children are little heathens, based upon all of the chore charts and discipline crafts I come up with. It's not true (all the time), they just need a little help along the way. My newest creation is Disobedience Dimes. Each time that they are disobedient, rude, whiny, etc., they have to pay a dime to the Disobedience Dimes jar. Don't worry--I have to pay into it, too, if I'm rude. They are earning money by doing their chores, but know that if they want to keep all of that money, they need to be on good behavior. I'm not a horribly mean mom; I do give warnings and freebies sometimes. So far, the results have been promising!


This was my first try at rosettes. So simple! This rosette covers the words on the back of the jar.

I couldn't find the metal cover for the jar, so I just used paper coated in Mod Podge, then cut a slit into it.

July 31, 2010
Allowance Chart
Remember our cookie sheet chore chart? My husband and I decided that it needed something to go along with it, a chart to keep track of chores on a weekly basis. The cookie sheet chart is perfect for assigning chores, serving as a visual reminder for what needs to be done, and keeping track of which chores have/have not been completed. It lacks a long term record, though, for what has been done throughout the week. We are going to be instituting an allowance for our children, something that they can earn for completing all of their daily chores for an entire week. So I created a new chart that will record when all of the chores from the cookie sheet chart are finished each day, allowing us to know if all chores have been done every day of the week.
I snagged this sign from my son's school rummage sale last spring. I just covered it with paper and Mod Podge, then used a set of hooks and clips that I had lying around from Ikea. The two little bees and beehive are stamps from Stampin' Up.


I snagged this sign from my son's school rummage sale last spring. I just covered it with paper and Mod Podge, then used a set of hooks and clips that I had lying around from Ikea. The two little bees and beehive are stamps from Stampin' Up.


When they reach "HIVE SWEET HIVE, " they get their allowance!
I'm linking up to:

I'm linking up to:
May 5, 2010
Cabinet Door to Picture Holder
Remember this trip? During that IKEA run, I picked up a couple of white cabinet doors. At the time, I wasn't sure what I was going to do with them. I had seen a bunch of DIY projects using cabinet doors floating around blogland, but didn't have one pinned down. Once I got home, the cabinet door and I stared at each other for a long time (several times). I literally had no idea what I wanted to do with it. Then one night, I just started working. And suddenly, I had created a picture holder that had become one of my favorite creations ever. I still haven't decided how to hang it one the wall--I'm up for suggestions! I can't wait to show you!


I used stamps on the sides and the the bottom. I wanted to used stamps for the top too, but couldn't find anything just right. So instead, I used my Silhouette to cut vinyl, and laid that along either side of the photo clip. I just glued the clip to the cabinet door. I like it because I'll be able to swap out the photos so easily.
I couldn't be happier. And guess what? This cabinet door cost me $2. Sweet!
April 26, 2010
Cookie Sheet Chore Chart
After spending a completely ridiculous and infuriating amount of time two hours cleaning the house this morning, I decided enough was enough.


Now their responsibilities are clear as day. I wanted something that would be flexible, that I could change as needed. So I spray painted a cookie sheet and hot glued down some ribbon. I Mod Podged their names, and the To-Do and Done papers to the painted cookie sheet. Then I wrote all the chores (I've been adding things all evening) on various pieces of paper from my scraps pile. Finally I stuck a piece of magnetic tape to the back of each chore. I added a few buttons on for decoration, then I was done.
The best part of this was that I already had all of the materials I needed. I just rounded up a bunch of stuff from my crafts supplies, grabbed my least favorite cookie sheet and got to work. Simple but effective. The kids really like moving each task from the To-Do area to the Done area. I guess it's the same as how I like to cross things off of my to-do list. There's some satisfaction in seeing that it's done. We'll see if they're as enthusiastic tomorrow, but at least my house is clean tonight...
April 11, 2010
Welcome to Hogwarts!
The party was amazing. AMAZING! (If I do say so myself...) The kids had a wonderful time, the parents were blown away, and I didn't even end up with migraine! My husband and I spent countless hours planning, creating, and preparing for this party; It was worth every minute.
Upon arrival, children were escorted through the front door, which had been transformed into Platform 9 3/4. I made a Platform 9 3/4 sign by painting a piece of wood red, then using my Silhouette to cut "HOGWARTS EXPRESS" from sparkly gold paper. I Mod Podged the letters to the board, along with a Hogwarts crest that I found on Google Images, then printed and cut. I used a bowl to draw a circle on the board, painted it white, then drew and painted the 9 3/4 with black paint. I think it looks pretty close to the sign from the movie!
The brick wall was made from a light blue sheet that I picked up at Goodwill. My husband cut it to fit our doorway, then drew the bricks on with a Sharpie. He also cut the slit for the kids to run through. I spray painted it red, keeping the spray can at a bit of a distance so as to create an uneven look, like bricks.

I made this flag to hang outside our house. Sort of like balloons for a regular party, right? The how-to for the flag can be found here.

Inside our house, the kids found The Great Hall, with a nighttime sky on the enchanted ceiling.

In the books and movie, robes are a must-have at Hogwarts. I sewed a robe for each of the kids, nine total. They took me about a half-hour each, although eventually I just assembly-lined them, doing all the ironing at one time, hems at one time, etc.

After they had their robes, the children were taken to Ollivander's Wand Shop. There, they could choose a wand. My husband carved unique patterns into all of the wands. Didn't he do an incredible job?

The kids decorated their wands with markers.

They also could choose Phoenix feathers or dragon scales for the core of their wands. My husband drilled holes into one end of each wand. The kids stuffed them with feathers and small jewels (dragon feathers), and then I sealed the holes with hot glue.

Next was the Sorting Hat. I created this hat using crumpled brown paper bags. I hot glued torn pieces of the bags to a black witches hat that we had in our dress up clothes. I tried to make the face look like the hat from the movie--My son loved it, but I'm not so sure.

I thought long and hard about how to have the Sorting Hat speak. We thought about walkie-talkies or recordings. But eventually, we decided to go with a baby monitor. We hung a the speaker-end of the monitor inside the Sorting Hat, then put the other end in our basement. My husband went downstairs and spoke into the baby monitor as the Sorting Hat, so it sounded like the hat was talking. It worked perfectly--One of the dad's even asked me afterwards how we did it. Success!

After being sorted, we went to Potions Class. Each child got a small ceramic cauldron (found at JoAnn's). The first potion contained an explosive clear liquid (water), jellyfish serum (bubble solution), and fire rocks (dry ice). The kids were amazed by this.

We had to rinse out the cauldrons between potions, so the kids spent the time stupifying each other. We brought the benches for our picnic table inside and covered them with Dollar Store black tablecloths (same for the table). It really added to the look of The Great Hall.

The next potion was a mixture of water and Iocane Powder (cornstartch). This went unbelievably well. Everybody had fun mixing, then being shocked that their solid turned "runny." One kid said, "It's like a solid liquid!" Yup, you got it.

This made a huge mess, so I was very glad that we had put down the tablecloths.

After Potions was over, it was time for a little QUIDDITCH!

Everybody got a broom, made from sticks and brush, found on the side of the road, courtesy of my hubby.

We had three foam balls, all red--One large one that was the Quaffle and two smaller ones that were the Bludgers. The kids were separated into two teams. They had to try to get the Quaffle through one of the hoops, but if they were hit by a Bludger, they had to drop the Quaffle. They also had to stay on their brooms.

The rings were made by spray painting hula hoops that were nailed to wood, stuck in the ground. There were three on each side, just like in real Quidditch.

That's a Bludger.

Prior to the party, I spray painted a golf ball gold, then hid it in our yard. We chose a Seeker from each team, and rotated the Seekers each time a team scored--Those kids were responsible for searching the yard for the Golden Snitch. Here it is after being found.


Quidditch took a lot of energy, so it was time for some food! Cake time! My son wanted a Golden Snitch cake--No pressure there, right? This is what I came up with:

I have a lot of pictures from the making of this cake, so I'll post a how-to sometime in the near future. In case you're wondering, though, yes, the wings are edible too!
Edit: Here's the how-to on the cake.


This was the coolest part of the cake by far--It was filled with Jelly Bellies, i.e.. Bertie Botts Every Flavor Beans! When I cut the first piece out of the cake, the Jelly Bellies all spilled out too. The kids (and adults!) thought that it was pretty amazing. One of the dads was completely incredulous that I had made the cake--He told me that it was "just so magical." Talk about a compliment!

We also served Butterbeer. It was Cream Soda (CAUTION: Be sure to buy non-caffeinated soda! The first time my husband bought it, I checked the can and it had caffeine. Can you even imagine?!?), mixed with Butterscotch Syrup. I served it in small Ball glass jars that I had put in the freezer before the party, and then sprayed some Ready-Whip on top. I liked it, so did a few of the kids, but I'm not sure I'd make it again...

So that's our party! I forgot to take any pictures of the invitations--They were invitations to Hogwarts, printed on parchment paper, then sealed with red wax and the Hogwarts H. I'll see if I can scrounge one up for pictures. I think the reason this party worked so well was because of all the prep-time. We also kept each activity to 15 minutes, so nobody got bored. Everything moved quickly and fluidly, because of the preparation. My son said that it was the best party he'd every been to, and, pardon my lack of humility here, I'm going to have to agree with him!
I'm linking up to these parties:


Subscribe to:
Posts (Atom)




 Posts
Posts