Showing posts with label Spring. Show all posts

March 22, 2010

Spring Wreath Tutorial

I searched high and low for a spring wreath to hang on my front door.  I searched craft blogs and stores, but found nothing that I loved.  (I really have to love it if it's going to be on my front door.)  After a very successful Goodwill trip on Saturday, though, I at least had something to work with. Here's what I did:

Materials:
Twig Wreath Form (Mine was in the shape of three hearts)
Silk Flowers (Number will depend on your base--I used about 30)
Miniature Rose Blooms--2 colors (Again the number will depend on the size of your wreath)
Small Half-Pearl Beads (One for each silk flower)
Ribbon (About as thick as the outside width of your wreath)
Twine
Glue Gun

Step 1: Keep kids busy

Wreath Base (69 cents at Goodwill)

Step 2: Using your glue gun, cover the outside of the wreath with ribbon.


Step 3: Hot glue the silk blossoms to the front of the wreath.  My wreath base had small sticks, equally spaced, around the wreath.  I glued one blossom to the top of each of those sticks.  At the center of each heart, I used a large bright pink blossom, instead of the small yellow ones that I used around the rest of the heart.


Step 4: Ask your kids what you should do next.
Step 5: Follow their advice.  Glue a half-pearl to the center of each blossom.  ("What about jewels?")  I used a larger pearl for each of the large pink flowers.

Step 6: Cut miniature roses from their stems.  I cut them right at the base of the bloom.

Step 7: Cover the bottom of each rose with hot glue.  Then place it into your wreath, holding it in place for about 10 seconds to be sure the glue will hold.  Please just trust me on this.  I tried a gazillion ways of getting the roses to stay in place in the wreath.  Don't put the glue on the wreath and then the flower on the glue.  It won't work.  I promise.  Just use a lot of glue on the bottom of your flower and you'll be fine.


Step 8: Completely stuff the wreath with roses.  Seriously pack them in.  When they dry, they'll shrink.  I know you don't want holes in your wreath!


Step 9: Tie two twine handles, one along the front of the top of the wreath, and one towards the back of the top of the wreath.  If you only use one piece of twine to hang the wreath, it will tip forward or backward.  Again, just trust me.

Step 10: Twist the front twine handle with the back twine handle.

Now hang your wreath!  You did it!


I'm linking up to:

March 21, 2010

Coming Soon!

I spent all morning (between tying doll shoes, using scraps of fabric to create doll bedding, making snacks--every ten minutes, etc.) crafting a wreath for our front door!  Normally we'd be at church, but I still can't make it through three hours sitting in a pew and chairs.  Hubby's on call today, so the kids stayed home with me!  Sometimes I just love spending the day at home.

We made a super successful Goodwill run yesterday where I scored the base for my wreath.  So, coming soon is a tutorial for a spring wreath, using feux and real flowers!  Check back soon!

Happy Sunday,
Emily

March 7, 2010

Happy Spring Board


My house needs some bright Spring cheer, now that Spring is on its way.  At least, if I decorate for Spring, I can pretend that it's here...  With our budget always in mind, I decided to craft something cute to spruce up my living room.  I came up with a Happy Spring board!  I had all of the supplies in my arts and crafts room!  It was so simple and extremely fast.  The only piece that took any time at all was the hurry up and waiting for the Modge Podge to dry.
Here's the how-to:

Supplies:
7x7 piece of wood
6x6 piece of decorative card stock
2nd sheet of card stock in complimentary color/pattern for letters
Fabric Petals (Can be bought in the wedding section of most craft stores)
1 Jewel
Glue Gun
Modge Podge


1.) Cover your wood in Modge Podge.  Then lay your background card stock on top.  Cover that with Modge Podge.  It's going to hang over the edges just a little.  I thought about trimming it down, but actually liked the way it looked.  I painted all of my bare wood with Modge Podge too, as I wanted it to be the frame.

2.) Using your craft cutter, cut the letters HAPPY SPRING.  Super hard to figure out, right?


3.) Place your letters on the recently Modge Podged board.  Arrange them sort of haphazardly.  You'll want to angle "SPRING" at a diagonal up the board.  You'll need that bottom corner for your flower in a second.  Very carefully, lift one letter at a time to paint some Modge Podge on the board.  Replace that letter and continue with the next.  After all of the letters are well-secured, add another coat to the top.


4.) Arrange your flower petals in a solid, sheer, solid, sheer pattern.  When you glue the petals together, it will be easier if they're already laid out and ready.  Now place a small circle of hot glue on the top of your first petal, then place the next petal about one-third of the way across that first petal.  Make sure that the bottoms of the petals are lined up.  Continue glueing your petals together until you have a nice circle. Using your glue gun, fasten the jewel to the center of your flower.


5.) Hot glue your newly made flower to the bottom corner of your Happy Spring board.  Voila, you're done!

March 4, 2010

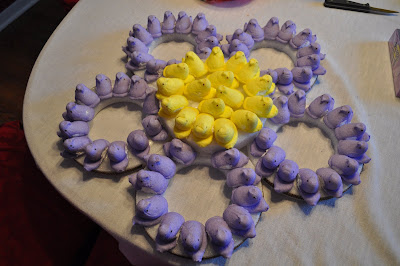
Flower Peep Wreath


My friend Cathy and I have started to have weekly play dates with our first graders and my four year old.  These are not ordinary play dates, though.  Heck no!  We are hosting weekly craft dates!  For our inaugural meeting, we decided to make Peep Wreaths, based on a craft by Martha Stewart.  Martha's craft, however, would have cost close to $40 per wreath.  That seems utterly ridiculous for a candy wreath!  So I made some adjustments and was able to cut the cost by about $10.  Still unbelievable, and not something I'd do again, but better than $40.  Here's what we did:

Supplies:
1 35" long Styrofoam Sheet
1 7" Styrofoam wreath form (for stencil)
1 7" Styrofoam circle (solid)
Floral Pins
4 Boxes of Peeps (60) for Flower Petals
2 Boxes of Peeps (20) for Flower Center
Glue Gun
1/2" Ribbon

1.) Instead of buying $4 styrofoam circles, I purchased one circle and a sheet of styrofoam.  Then I traced the circles onto the sheet and cut them out myself.  Actually my sweet husband did this for me, as I had back surgery a few weeks ago and am not quite fixed yet.  I think that we used 7" circles.


2.) Using floral pins (like super long staples), pin your circles/petals to the solid center.  I placed all of the petals in a circle, touching each other on both sides, then laid the solid circle on top and pinned it there.  That worked better than trying to balance the petals on top.


Turn the whole flower over and pin it again on the other side.

3.) Using a glue gun, cover the perimeter of each petal with ribbon.  I used too thin ribbon on one, so use 1/2" ribbon for complete coverage.


4.) Make a batch of Royal Icing.  There are tons of recipes for this, but I just combined 2 egg whites with 2 cups of Confectioners Sugar, and 1/2 teaspoon of lemon juice.  Blend until smooth.  Pour the icing into a ziplock bag and cut the tip off of one corner.  Just cut a tiny piece off or you'll end up pouring icing everywhere.

5.) Squeeze a ring of icing around each petal.


6.) Put the Peeps on the wreath!  Mine fit best with their heads facing in and tails out.  Use one color in the center and the other color on the petals.


DONE!!

I'm planning to use another floral pin to attach a loop of matching ribbon to the back of the flower center.  Then I'll hang it on a hook on the wall.  I am going to wait for the frosting to dry overnight before I hang it, though.  (Nothing like sliding icing-covered Peeps on the floor to make for a good time!)

This was a really great craft for the kids to do.  Simple, fun and tasty!

Follow Up: Hot glue the petals to the center of the flower.  Also use a glue gun to attach the floral pin and ribbon to the back of the center of the flower for hanging.  The wreath is heavy!


Related Posts with Thumbnails