As you may have guessed from the title of the post, it's Teacher Appreciation Week at school. My son, who is in first grade, has the most wonderful teacher. She is everything a first grade teacher should be, which for my son means that she loves him and treats him like an individual little person. She runs a tight ship, but knows each sailor's special needs and knows how to best help each one learn. We decided that Mrs. Powell deserved something wonderful this year. Let me show you what we came up with and how we made it!
Every day, my son's first grade class has Writer's Workshop. They write, then edit. For writing, they use black and blue gel pens. For editing, they use green pens. (And ever first grade class uses pencils!) So we decided to make a pen holder! My son said that all of their pens and pencils are just in a bucket right now, and as a crafty lady, well that just won't do! So this is what we made!
I am on a strict no-buying rule right now at home. I have to use up all of my supplies before I can buy anything else. Luckily I had this wood caddy that we hadn't used in years, just sitting in my basement. BUT, if you want to make this too, I checked Target and you can find one just like it here.
SUPPLIES
Wood Caddy
Scrapbook Paper
Mod Podge
Paint Brush (to apply Mod Podge)
Ruler
Pencil
Scissors
Yarn (for measuring)
Exacto Knife
Silhouette (or some other cutting machine--You could also just paint the letters on!)
Trace all four sides on the back of your scrapbook paper. If you trace onto the front, your pencil marks will show. Now cut out all of the pieces.
Mod Podge the paper on all four sides. (This could take a while because you have to let one side dry before you can work on another one. Hang in there!)
Measure the width and length of the top of the side. Cut a strip of scrapbook paper to fit those measurements. Paint a thin layer of Mod Podge onto the caddy, then lay the strip of paper on top. Use your hands to gently scrunch the paper to fit.
Paint another layer of Mod Podge on top of the paper. Scrunch the paper again, molding it to fit over the rounded top. (This is messy and imperfect, but it's the best that I could do. I actually liked how it looked in the end too!)
Use a piece of yarn to measure the circumference of the handle.
Trace (onto the backside again) around the top half only of the caddy. We'll only be Mod Podging paper onto the top half--inside.
Take the following measurements: (The point of this is to help us know where to put the circle of yarn that we measured, so that we'll know where to cut the circle from the paper. It's ridiculously hard and there's probably a better way, so if I'm missing something obvious...)
Here's the hard part and I cannot believe I didn't take a picture! I'm so sorry! Mark your measurements on the paper, lay your yarn circle down, then cut. Just do it and pray that it lines up. My circle was a little off, so I just cut a little more from one side to make it even. The hole around the rod was a too big, but hey, that's just a tiny detail! Good luck! After you cut your hole, cut a slit from from the top of the paper down to the hole. Then Mod Podge it in place!
After Mod Podging, if your edges hang over, use an exacto knife to trim them even. Do a better job than I did!
Measure the width and lengths of the top the compartments. Mine was the same width for every piece. Cut your scrapbook paper to match.
Mod Podge the paper on to the top of each compartment.
Measure the length of your rod. I was able to do this by measuring the length of the inside of the caddy, as my ruler wouldn't fit directly next to the rod.
Use a piece of yarn (cut it) to measure the circumference of the rod. You can use the same one as before if it hasn't magically disappeared.
Cut a piece of scrapbook paper to the length of the rod and the height equalling the circumference of the rod, plus a little bit. I know that's not mathematical, but I didn't measure how much I added. Just add enough for the paper to overlap when you wrap it around the rod.
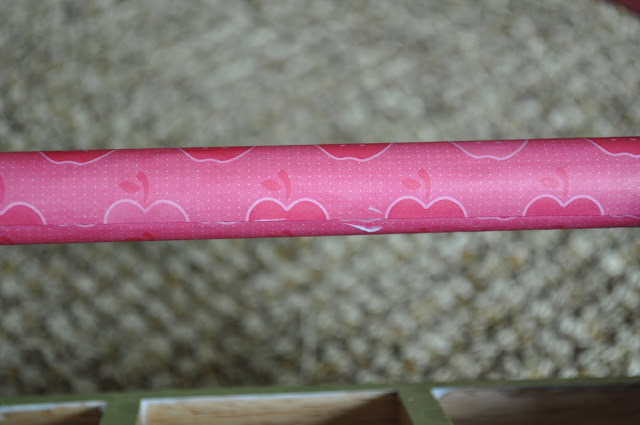
Coat the rod in Mod Podge, then wrap the paper around the rod. Let that dry, then coat the paper with Mod Podge.
Now you're done with the hard part! If you have a Silhouette or Cricut, you can continue on with that. You can also just leave it as is (because it looks awesome already!). If you don't have a paper cutting machine, you can use paint instead!
I used white vinyl for the two long sides of the caddy. I put the teacher's name on one side and a "phrase" I heard somewhere (but can't remember where) on the other side. Then I filled it with pens and pencils. Let me show you:
That's all for the tutorial. But I do want you to see what else we gave to my son's teachers. My daughter and I made these fantastic cookies. She loves to cook, so this worked out wonderfully. I got this cookie cutter set as a gift, but I happen to know you can find it at Williams & Sonoma. (FYI, Mr. Seth is the student teacher.)
We added a little bit of icing, then stuck them in these sweet little boxes that I had picked up on clearance at JoAnn's a while ago. I wish that I had had more time because I would have added a little color to the boxes, but I'm reminding myself that it's what's inside that counts!
The best part of all of this was the smile on my son's teacher's face. She was so happy, so touched. I think that we made her day. But boy did she deserve it.


Wow! If I tell you that I keep my pens and pencils in jars, will you send me a cute caddy? ;)
ReplyDeleteWhat an awesome idea! I love that!
ReplyDeleteso so cute! I am so in love with it!
ReplyDeletegreat idea - really cute
ReplyDeleteThe pen and pencil holder is awesome! The cookies are fantastic (i bet they were yummy)! Only the best for two awesome and fantastic teachers. Great job Emily!
ReplyDelete