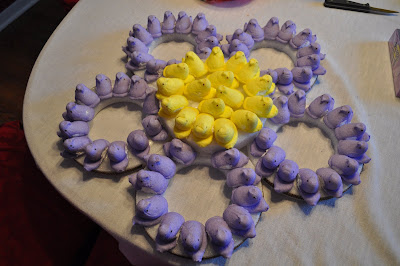
My friend Cathy and I have started to have weekly play dates with our first graders and my four year old. These are not ordinary play dates, though. Heck no! We are hosting weekly craft dates! For our inaugural meeting, we decided to make Peep Wreaths, based on a craft by Martha Stewart. Martha's craft, however, would have cost close to $40 per wreath. That seems utterly ridiculous for a candy wreath! So I made some adjustments and was able to cut the cost by about $10. Still unbelievable, and not something I'd do again, but better than $40. Here's what we did:
Supplies:
1 35" long Styrofoam Sheet
1 7" Styrofoam wreath form (for stencil)
1 7" Styrofoam circle (solid)
Floral Pins
4 Boxes of Peeps (60) for Flower Petals
2 Boxes of Peeps (20) for Flower Center
Glue Gun
1/2" Ribbon
1.) Instead of buying $4 styrofoam circles, I purchased one circle and a sheet of styrofoam. Then I traced the circles onto the sheet and cut them out myself. Actually my sweet husband did this for me, as I had back surgery a few weeks ago and am not quite fixed yet. I think that we used 7" circles.
2.) Using floral pins (like super long staples), pin your circles/petals to the solid center. I placed all of the petals in a circle, touching each other on both sides, then laid the solid circle on top and pinned it there. That worked better than trying to balance the petals on top.
Turn the whole flower over and pin it again on the other side.
3.) Using a glue gun, cover the perimeter of each petal with ribbon. I used too thin ribbon on one, so use 1/2" ribbon for complete coverage.
4.) Make a batch of Royal Icing. There are tons of recipes for this, but I just combined 2 egg whites with 2 cups of Confectioners Sugar, and 1/2 teaspoon of lemon juice. Blend until smooth. Pour the icing into a ziplock bag and cut the tip off of one corner. Just cut a tiny piece off or you'll end up pouring icing everywhere.
5.) Squeeze a ring of icing around each petal.
6.) Put the Peeps on the wreath! Mine fit best with their heads facing in and tails out. Use one color in the center and the other color on the petals.
DONE!!
I'm planning to use another floral pin to attach a loop of matching ribbon to the back of the flower center. Then I'll hang it on a hook on the wall. I am going to wait for the frosting to dry overnight before I hang it, though. (Nothing like sliding icing-covered Peeps on the floor to make for a good time!)
This was a really great craft for the kids to do. Simple, fun and tasty!
Follow Up: Hot glue the petals to the center of the flower. Also use a glue gun to attach the floral pin and ribbon to the back of the center of the flower for hanging. The wreath is heavy!


